How to Mount Outdoor Speakers
Every outdoor audiophile knows what a tremendous difference outdoor speakers can make to an immensely pleasurable audio experience. Whether it’s at the party, the poolside or an enjoyable BBQ, your guests will be pleasured to hear your favourite soundtracks playing from these outdoor speakers. Installing outdoor speakers may seem rather daunting at first, due to concerns on sound amplification, wiring and speaker mounting. In this guide, we’ll show you how to mount outdoor speakers to achieve good sound staging and bass reproduction.
Here are some things to look out for when installing outdoor speakers to ensure that you get the best outdoor sound experience:
1. Get high-quality speakers – Before you embark on mounting your outdoor speakers, the first thing you need to do is to get high-quality outdoor speakers that will last you for many years to come. We’ve written a guide here to help you decide how to choose the best outdoor speakers for your garden/poolside but to summarize, be sure to get speakers with excellent all-weather resistant construction to brave the outdoor elements. High-quality outdoor speakers typically require an amplifier to drive them, but this is actually a good thing because you can control all your outdoor speakers from a single multi-channel amplifier and improve your bass output from them.
2. Mount your speakers at a sturdy location – The important thing about mounting your outdoor speakers is ensuring that they are mounted on sturdy surfaces that will not rust or break. Mounting your outdoor speakers in a sturdy location ensures that it stays intact for many years to come, thereby maximizing your overall outdoor experience. Plus, this avoids the need to un-mount your speakers (as may be the case with deteriorating surfaces) and transfer them to another location.
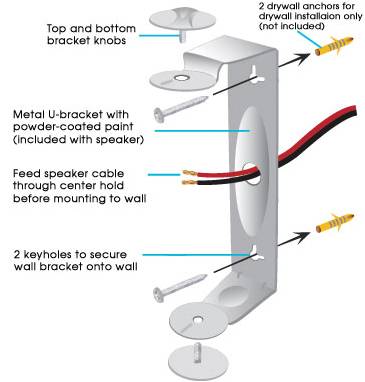
3. Hang your speakers higher – As with patio speakers, it is always good to hang and mount them at higher locations. This not only helps you to point down your speakers to increase “focus” on a particular location, it also helps with sound distribution since the speakers are projecting sound from a higher location. The figure below illustrates how can you mount speakers on your patio using a wall bracket.

4. Point the speakers downward – It is always important to tilt your speakers downward and towards the area you wish to blast music to. The reason for tilting speakers downward is that it helps with sound distribution and also prevents water from accumulating in the cones of the speaker which may damage the drivers. Doing this simple step will go a long way in preserving the integrity of your outdoor speakers.
5. The Golden Rule – When trying to figure out how to mount outdoor speakers, the ideal distance is to place speakers 10 feet apart from each other. This avoids the problems of sound staging and unbalanced projection which may occur at greater placement distances. Placing your speakers 10 feet apart also helps to reduce the length of wiring required to connect to your outdoor speakers.
6. Try to place your speakers under sheltered areas – It’s a well known fact that outdoor speakers are specifically designed to withstand outdoor elements such as wind, rain, frost and direct sunlight but it’s always better to place them under sheltered areas to maximize their durability. This would not only ensure that your speakers last longer, it also protects your speakers and helps to maintain good audio performance in the long run.
If you are interested in learning more about some of the best outdoor speakers in the market, we have also featured some of the best outdoor speakers in our top reviews, such as the top weatherproof speakers, patio speakers, rock speakers, outdoor ceiling speakers and rugged portable speakers so be sure to check them out!

